OpenAPI 3 Documentation With Spring Boot
In this tutorial, we are going to try out a Spring Boot Open API 3-enabled REST project and explore some of its capabilities. Springdoc-openapi java library is fast becoming very compelling.
We are going to refer to https://spring.io/guides/gs/rest-service/ and https://springdoc.org/.
Prerequisites:
- Java 8.x.
- Maven 3.x.
Steps
Start by creating a Maven JAR project. Below, you will see the pom.xml to use:
<?xml version="1.0" encoding="UTF-8"?>
<project xmlns="http://maven.apache.org/POM/4.0.0"
    xmlns:xsi="http://www.w3.org/2001/XMLSchema-instance"
    xsi:schemaLocation="http://maven.apache.org/POM/4.0.0 https://maven.apache.org/xsd/maven-4.0.0.xsd">
    <modelVersion>4.0.0</modelVersion>
    <parent>
        <groupId>org.springframework.boot</groupId>
        <artifactId>spring-boot-starter-parent</artifactId>
        <version>2.2.2.RELEASE</version>
        <relativePath ></relativePath> <!-- lookup parent from repository -->
    </parent>
    <groupId>com.example</groupId>
    <artifactId>sample</artifactId>
    <version>0.0.1</version>
    <name>sample</name>
    <description>Demo project for Spring Boot with
    openapi 3 documentation</description>
    <properties>
        <java.version>1.8</java.version>
    </properties>
    <dependencies>
        <dependency>
            <groupId>org.springframework.boot</groupId>
            <artifactId>spring-boot-starter-web</artifactId>
        </dependency>
        <dependency>
            <groupId>org.springdoc</groupId>
            <artifactId>springdoc-openapi-ui</artifactId>
            <version>1.2.32</version>
        </dependency>
        <dependency>
            <groupId>org.springframework.boot</groupId>
            <artifactId>spring-boot-starter-test</artifactId>
            <scope>test</scope>
            <exclusions>
                <exclusion>
                    <groupId>org.junit.vintage</groupId>
                    <artifactId>junit-vintage-engine</artifactId>
                </exclusion>
            </exclusions>
        </dependency>
    </dependencies>
    <build>
        <plugins>
            <plugin>
                <groupId>org.springframework.boot</groupId>
                <artifactId>spring-boot-maven-plugin</artifactId>
            </plugin>
        </plugins>
    </build>
</project>
Note the “springdoc-openapi-ui” dependency and “springdoc-openapi-maven-plugin” plugin.
Now, let’s create a small Java bean class.
package sample;
import javax.validation.constraints.Email;
import javax.validation.constraints.Max;
import javax.validation.constraints.Min;
import javax.validation.constraints.NotBlank;
import javax.validation.constraints.NotNull;
import javax.validation.constraints.Pattern;
import javax.validation.constraints.Size;
import javax.xml.bind.annotation.XmlAccessType;
import javax.xml.bind.annotation.XmlAccessorType;
import javax.xml.bind.annotation.XmlRootElement;
import org.hibernate.validator.constraints.CreditCardNumber;
@XmlRootElement(name = "person")
@XmlAccessorType(XmlAccessType.FIELD)
public class Person {
    private long id;
    private String firstName;
    @NotNull
    @NotBlank
    private String lastName;
    @Pattern(regexp = ".+@.+\\..+", message = "Please provide a valid email address")
    private String email;
    @Email()
    private String email1;
    @Min(18)
    @Max(30)
    private int age;
    @CreditCardNumber
    private String creditCardNumber;
    public String getCreditCardNumber() {
        return creditCardNumber;
    }
    public void setCreditCardNumber(String creditCardNumber) {
        this.creditCardNumber = creditCardNumber;
    }
    public long getId() {
        return id;
    }
    public void setId(long id) {
        this.id = id;
    }
    public String getEmail1() {
        return email1;
    }
    public void setEmail1(String email1) {
        this.email1 = email1;
    }
    @Size(min = 2)
    public String getFirstName() {
        return firstName;
    }
    public void setFirstName(String firstName) {
        this.firstName = firstName;
    }
    public String getLastName() {
        return lastName;
    }
    public void setLastName(String lastName) {
        this.lastName = lastName;
    }
    public String getEmail() {
        return email;
    }
    public void setEmail(String email) {
        this.email = email;
    }
    public int getAge() {
        return age;
    }
    public void setAge(int age) {
        this.age = age;
    }
}
This is an example of a Java bean. Now, let’s create a controller.
package sample;
import javax.validation.Valid;
import org.springframework.web.bind.annotation.RequestBody;
import org.springframework.web.bind.annotation.RequestMapping;
import org.springframework.web.bind.annotation.RequestMethod;
import org.springframework.web.bind.annotation.RestController;
@RestController
public class PersonController {
    @RequestMapping(path = "/person", method = RequestMethod.POST)
    public Person person(@Valid @RequestBody Person person) {
        return person;
    }
}
Above is a sample REST Controller.
Let’s make some entries in src\main\resources\application.properties.
application-description=@project.description@
application-version=@project.version@
logging.level.org.springframework.boot.autoconfigure=ERROR
The above entries will pass on Maven build-related information to the OpenAPI documentation.
Finally, let’s write the spring boot application class
package sample;
import org.springframework.beans.factory.annotation.Value;
import org.springframework.boot.SpringApplication;
import org.springframework.boot.autoconfigure.SpringBootApplication;
import org.springframework.context.annotation.Bean;
import org.springframework.context.annotation.ComponentScan;
import io.swagger.v3.oas.models.OpenAPI;
import io.swagger.v3.oas.models.info.Info;
import io.swagger.v3.oas.models.info.License;
@SpringBootApplication
public class SampleApplication {
    public static void main(String[] args) {
        SpringApplication.run(SampleApplication.class, args);
    }
    @Bean
    public OpenAPI customOpenAPI(@Value("${application-description}") String appDesciption, @Value("${application-version}") String appVersion) {
     return new OpenAPI()
          .info(new Info()
          .title("sample application API")
          .version(appVersion)
          .description(appDesciption)
          .termsOfService("http://swagger.io/terms/")
          .license(new License().name("Apache 2.0").url("http://springdoc.org")));
    }
}
Also note how the API version and description is being leveraged from application.properties.
At this stage, this is what the project looks like in Eclipse:
Above are the project contents. Next, execute the mvn clean package from the command prompt or terminal. Then, execute java -jar target\sample-0.0.1.jar.
You can also launch the application by running the SampleApplication.java class from your IDE.
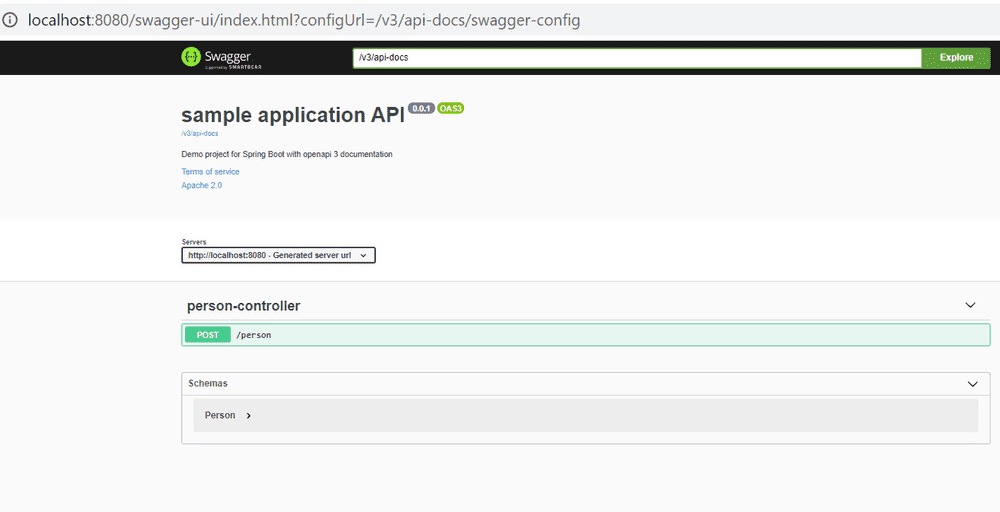
Now, let’s visit the Swagger UI — http://localhost:8080/swagger-ui.html:
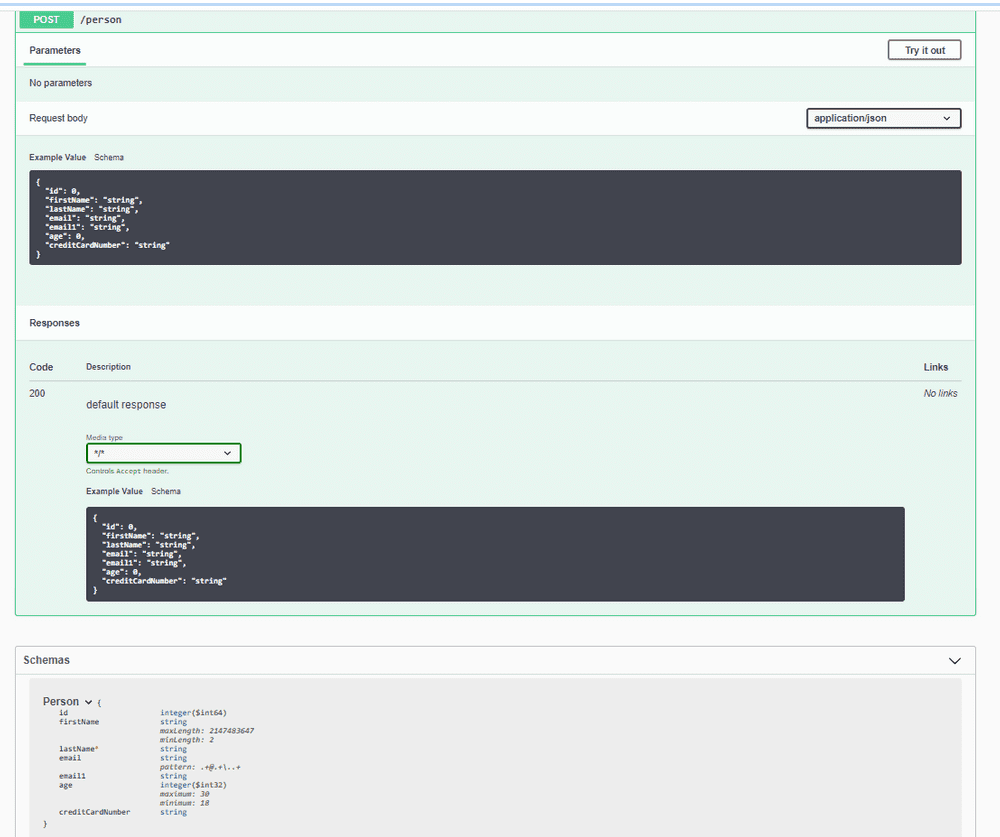
Click the green Post button and expand the > symbol on the right of Person under Schemas.
The nice thing is how the contract is automatically detailed leveraging JSR-303 annotations on the model. It out-of-the-box covers many of the important annotations and documents them. However, I did not see it support out of the box @javax.validation.constraints.Email and @org.hibernate.validator.constraints.CreditCardNumber at this point in time.
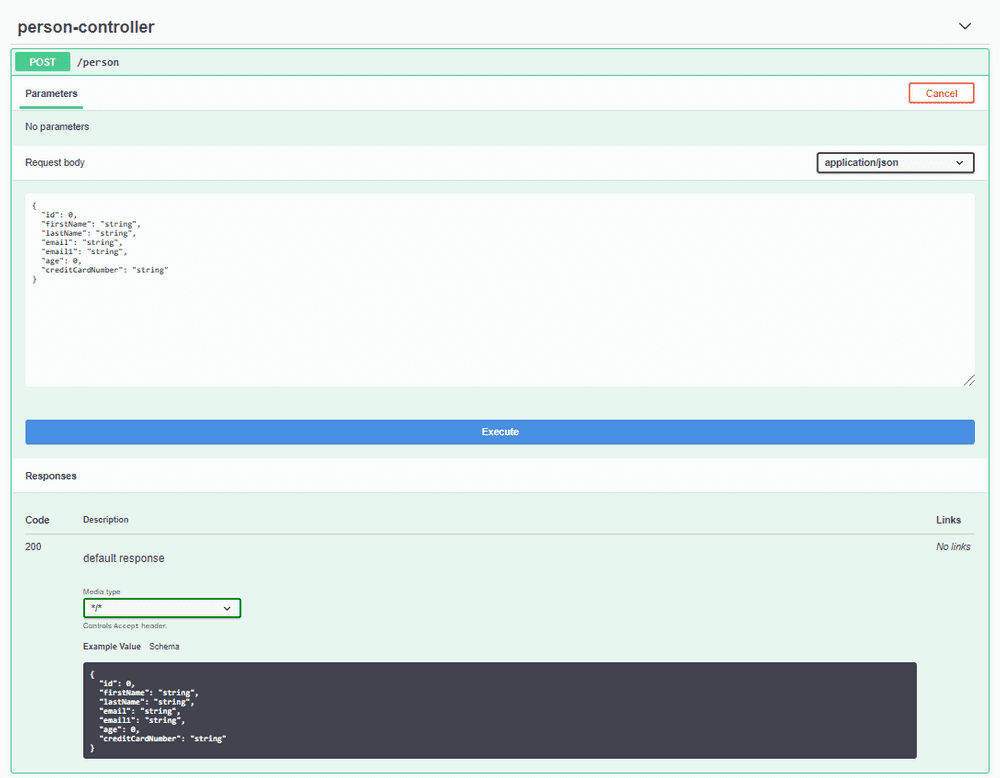
For completeness, let’s post a request. Press the Try it out button.
Press the blue execute button.
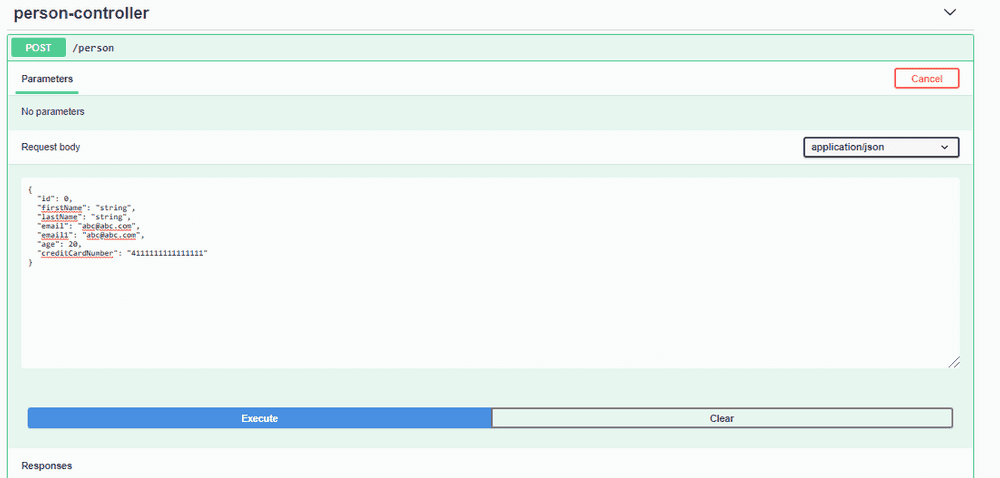
Let’s feed in a valid input:
JSON
{
  "id": 0,
  "firstName": "string",
  "lastName": "string",
  "email": "[email protected]",
  "email1": "[email protected]",
  "age": 20,
  "creditCardNumber": "4111111111111111"
}
Let’s feed that valid input into the Request Body Section
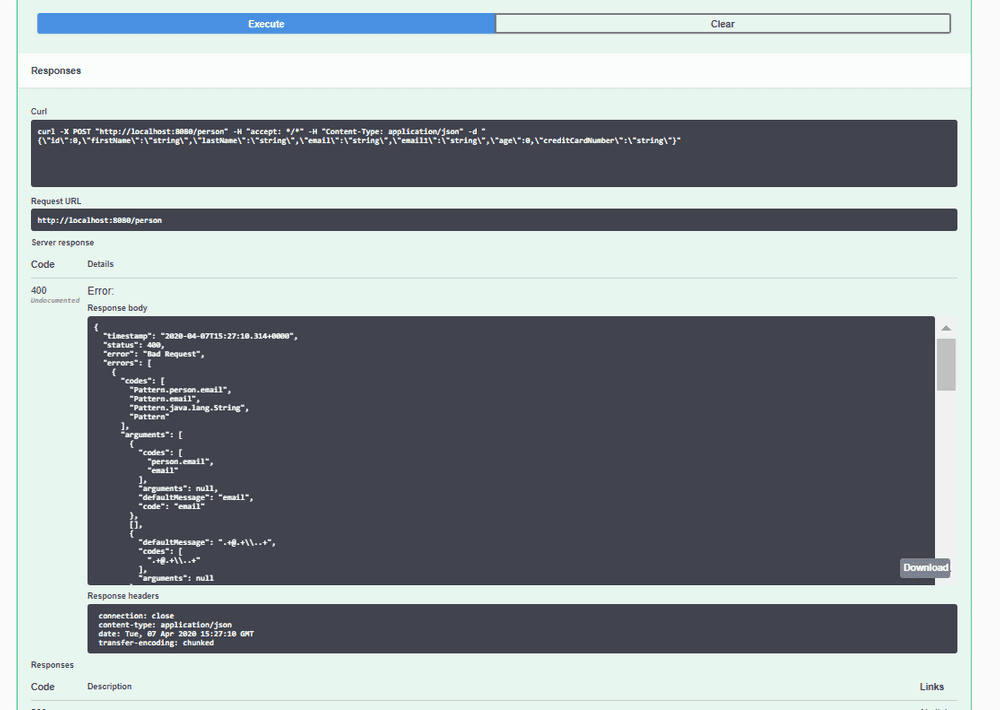
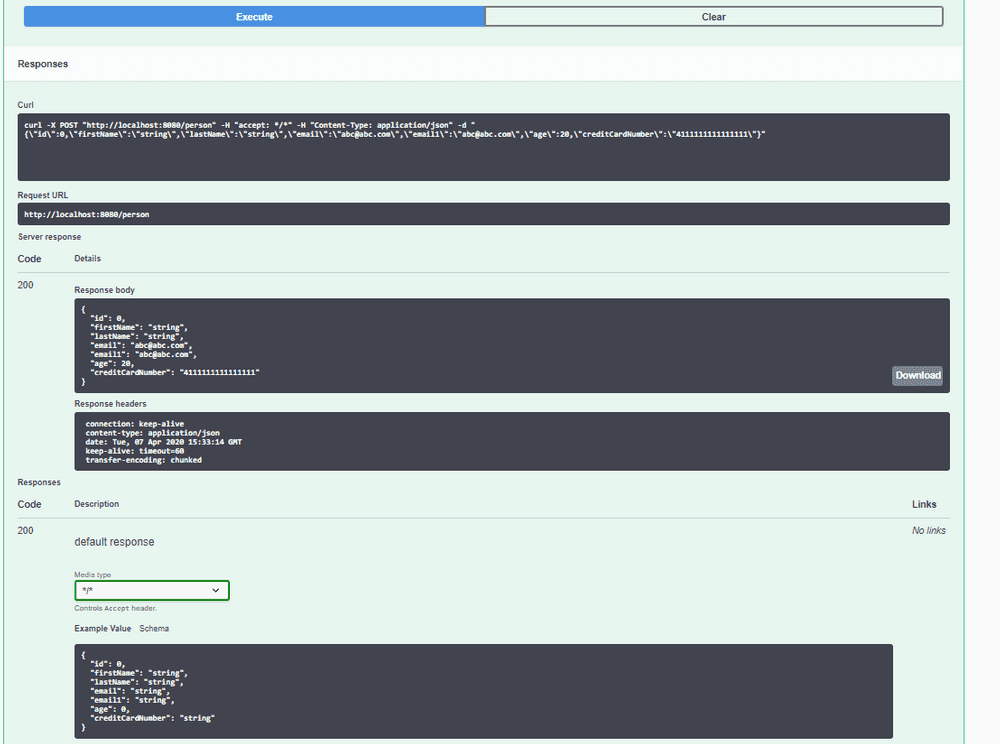
On pressing the blue Execute button we see the below:
This was only a brief introduction to the capabilities of the dependency:
XML
<dependency>
    <groupId>org.springdoc</groupId>
    <artifactId>springdoc-openapi-ui</artifactId>
    <version>1.2.32</version>
</dependency>
Troubleshooting Tips
- Ensure prerequisites.
- If using the Eclipse IDE, we might need to do a Maven update on the project after creating all the files.
- In the Swagger UI, if you are unable to access the “Schema” definitions link, it might be because you need to come out of the “try it out “ mode. Click on one or two Cancel buttons that might be visible.

