What is Servlet and How does it work
In this tutorial we are going to learn and understand Servlet and its working.
Understand Servlet and its working
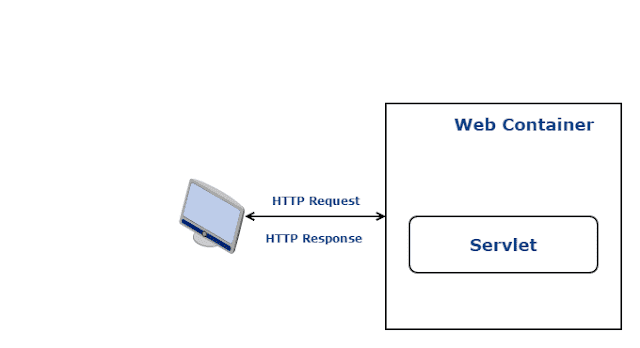
Servlets are mainly used to create web applications. We can’t run the Servlet program like a standalone program. Servlets are only run inside a web container (like tomcat, jetty, JBoss…etc). Also, another advantage of Servlet is that it will respond to the HTTP requests. Below shows a diagrammatic representation of that.
Start with a Program
To get a basic knowledge of Servlet, it’s better to start with a sample program. I suppose you already installed java JDK in your machine else please install it. Following steps explains the further steps.
Step 1: The Web container is mandatory for Servlet programming. So you must download a web container as the first step. Here I am using Tomcat Server.
Step 2: Next we want to create some Servlet program and deploy it into the web container. Here follows the sample code of a Servlet class
package com.behindjava.servlet;

import java.io.*;
import javax.servlet.*;
import javax.servlet.http.*;

// For Servlet creation you must need to extend your class with HttpServlet
public class BehindJavaServlet extends HttpServlet {

  private String message;

  public void init(ServletConfig servletConfig) throws ServletException
  {
      //Initialization Method
   this.message = servletConfig.getInitParameter("message");
  }

  public void doGet(HttpServletRequest request,
                    HttpServletResponse response)
            throws ServletException, IOException
  {
      // Setting the response content type
      response.setContentType("text/html");

      //Adding the string "Behind Java Example" as h1 text with the servlet response
      PrintWriter out = response.getWriter();
      out.println("<h1>" + "Message is --- "+ message + "</h1>");
  }

  public void destroy()
  {
      // Additional destroy actions.
  }
}
Lets analyse the above class
For creating a Servlet class we need to extend that class with HttpServlet Class (In above code also we are extending our class with HttpServlet class). What is the importance of HttpServlet Class?
We are creating Servlet for java web application. In the case of web application browsers are mainly used in client side. So for browsers they are mainly communicated to the server via HTTP Protocol. So HttpServlet is a java implemented class which handle the HTTP Request that’s why for creating our own Servlet class we need to extend the HttpServlet class. In HttpServlet contains the separate methods for handling different types of HTTP requests like GET, POST, PUT, HEAD…etc.
How HttpServlet class looks like?
HttpServlet is an abstract class which extends GenericServlet class and it implements the Serializable interface. If you find the source code of HttpServlet class it contains no abstract methods but it is an abstract class because this class created according to template method design pattern. The methods specific for HTTP request type (like doGet(), doPost(),doPut()…etc) have default behaviours of returning a HTTP 405 Method Not Implemented error. If those methods were all abstract, you would be forced to override them all, even though your business requirements don’t need it at all.
What is GenericServlet and what is the use of it?
GenericServlet class is an abstract class which implements Servlet interface, ServletConfig and Serializable interfaces. It provides the implementation of all the methods of these interfaces except the service method. It is a protocol independent class. So you can implement your own protocol supporting class by extending this class and overriding the service method inside this class. Service method main method which provides service for the incoming request. It is invoked at each time when the user requests for a servlet.
I think you got a good understanding about HttpServlet class from above answers. If you find my above example you will get some overrided method implementations like init(), doGet(), destroy() lets look into its order of execution.
What is the order of execution of init(), doGet(), destroy() methods?
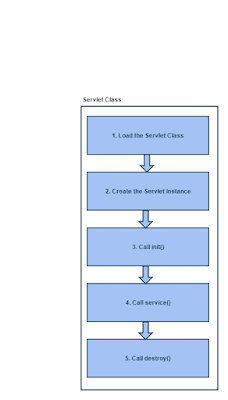
In a Servlet life cycle mainly contains 5 steps which follow in the following diagram
When a Servlet instance is created the init() method become fired. The method init() allows Servlet to initialize itself before the first request is processed. You can specify init parameters to the servlet in the web.xml file.
For every request received to the servlet, the servlets service() method is called. For HttpServlet subclasses, one of the doGet(), doPost() etc. methods are typically called. As long as the servlet is active in the servlet container, the service() method can be called.
When a servlet is unloaded by the servlet container, its destroy() method is called. This step is only executed once, since a servlet is only unloaded once.
So lets go to the remaining steps
Step 3: Create the deployment descriptor file
What is deployment descriptor?
The web.xml file is actually known as deployment descriptor file. This file is an XML document that defines everything about your application that a server needs to know like servlets and other components like filters or listeners, initialization parameters, container-managed security constraints, resources, welcome pages, etc.
For our sample application the web.xml file looks like follows
<?xml version="1.0" encoding="ISO-8859-1"?>

<!DOCTYPE web-app
    PUBLIC "-//Sun Microsystems, Inc.//DTD Web Application 2.3//EN"
    "http://java.sun.com/dtd/web-app_2_3.dtd">

<web-app>

  <servlet>
    <servlet-name>BehindJava</servlet-name>
    <servlet-class>com.behindjava.servlet.BehindJavaServlet</servlet-class>
     <init-param>
        <param-name>message</param-name>
        <param-value>Namaste BehindJava</param-value>
        </init-param>
  </servlet>

  <servlet-mapping>
    <servlet-name>BehindJava</servlet-name>
    <url-pattern>/behindjava</url-pattern>
  </servlet-mapping>
</web-app>
Here we are creating the BehindJava servlet and mapping the BehindJavaServlet class to that servlet (this is done between
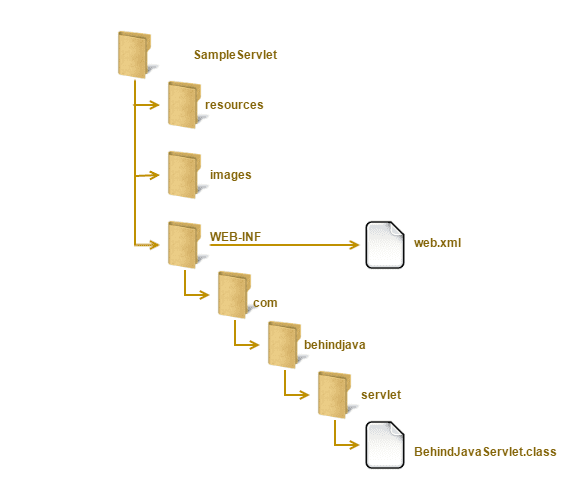
Step 4: Creation of folder structure. In above we created a Servlet class and currosponding deployment descriptor file. Now we need to deploy the application into the tomcat (web container). Before that we need to create a directory structure for deployment file. the directory structure looks like follows
Step 5: Start tomcat and run the url. The last step is deploy the folder structure into webapps folder of tomcat and start start tomcat. Then request the url http://localhost:8080/SampleServlet/behindjava It.


